什么是 AST
抽象语法树(Abstract Syntax Tree),简称 AST,初识 AST 是在一门网页逆向的课程,该课程讲述了 js 代码中混淆与还原的对抗,而所使用的技术便是 AST,通过 AST 能很轻松的将 js 源代码混淆成难以辨别的代码。同样的,也可以通过 AST 将其混淆的代码 还原成执行逻辑相对正常的代码。
例如下面的代码(目的是当天时间格式化)
Date.prototype.format = function (formatStr) {
  var str = formatStr
  var Week = ['日', '一', '二', '三', '四', '五', '六']
  str = str.replace(/yyyy|YYYY/, this.getFullYear())
  str = str.replace(/MM/, (this.getMonth() + 1).toString().padStart(2, '0'))
  str = str.replace(/dd|DD/, this.getDate().toString().padStart(2, '0'))
  return str
}
console.log(new Date().format('yyyy-MM-dd'))
通过 AST 混淆的结果为
const OOOOOO = [
  'eXl5eS1NTS1kZA==',
  'RGF0ZQ==',
  'cHJvdG90eXBl',
  'Zm9ybWF0',
  '5pel',
  '5LiA',
  '5LqM',
  '5LiJ',
  '5Zub',
  '5LqU',
  '5YWt',
  'cmVwbGFjZQ==',
  'Z2V0RnVsbFllYXI=',
  'Z2V0TW9udGg=',
  'dG9TdHJpbmc=',
  'cGFkU3RhcnQ=',
  'MA==',
  'Z2V0RGF0ZQ==',
  'bG9n',
]

;(function (OOOOOO, OOOOO0) {
  var OOOOOo = function (OOOOO0) {
    while (--OOOOO0) {
      OOOOOO.push(OOOOOO.shift())
    }
  }

  OOOOOo(++OOOOO0)
})(OOOOOO, 115918 ^ 115930)

window[atob(OOOOOO[694578 ^ 694578])][atob(OOOOOO[873625 ^ 873624])][
  atob(OOOOOO[219685 ^ 219687])
] = function (OOOOO0) {
  function OOOO00(OOOOOO, OOOOO0) {
    return OOOOOO + OOOOO0
  }

  var OOOOOo = OOOOO0
  var OOOO0O = [
    atob(OOOOOO[945965 ^ 945966]),
    atob(OOOOOO[298561 ^ 298565]),
    atob(OOOOOO[535455 ^ 535450]),
    atob(OOOOOO[193006 ^ 193000]),
    atob(OOOOOO[577975 ^ 577968]),
    atob(OOOOOO[428905 ^ 428897]),
    atob(OOOOOO[629582 ^ 629575]),
  ]
  OOOOOo = OOOOOo[atob(OOOOOO[607437 ^ 607431])](/yyyy|YYYY/, this[atob(OOOOOO[799010 ^ 799017])]())
  OOOOOo = OOOOOo[atob(OOOOOO[518363 ^ 518353])](
    /MM/,
    OOOO00(this[atob(OOOOOO[862531 ^ 862543])](), 671347 ^ 671346)
      [atob(OOOOOO[822457 ^ 822452])]()
      [atob(OOOOOO[974597 ^ 974603])](741860 ^ 741862, atob(OOOOOO[544174 ^ 544161])),
  )
  OOOOOo = OOOOOo[atob(OOOOOO[406915 ^ 406921])](
    /dd|DD/,
    this[atob(OOOOOO[596004 ^ 596020])]()
      [atob(OOOOOO[705321 ^ 705316])]()
      [atob(OOOOOO[419232 ^ 419246])](318456 ^ 318458, atob(OOOOOO[662337 ^ 662350])),
  )
  return OOOOOo
}

console[atob(OOOOOO[490983 ^ 490998])](
  new window[atob(OOOOOO[116866 ^ 116866])]()[atob(OOOOOO[386287 ^ 386285])](
    atob(OOOOOO[530189 ^ 530207]),
  ),
)
将上述代码复制到浏览器控制台内执行,将会输出当天的年月日。
AST 有什么用
除了上述的混淆代码,很多文本编辑器中也会使用到,例如:
- 编辑器的错误提示、代码格式化、代码高亮、代码自动补全;
elint、pretiier对代码错误或风格的检查;webpack通过babel转译javascript语法;
不过本篇并非介绍 AST 的基本概念,看本篇你只需要知道如何通过 babel 编译器生成 AST 并完成上述的混淆操作即可。
有必要学 AST 吗
如果作为 JS 开发者并且想要深入了解 V8 编译,那么 AST 基本是必修课之一,像 Vue,React 主流的前端框架都使用到 AST 对代码进行编译,在 ast 学�习中定能让你对 JS 语法有一个更深入的了解。
AST 误区
AST 本质上是静态分析,静态分析是在不需要执行代码的前提下对代码进行分析的处理过程,与动态分析不同,静态分析的目的是多种多样的, 它可用于语法检查,编译,代码高亮,代码转换,优化,压缩等等场景。即便你的程序也许在运行时报错,但都不会影响 AST 解析(除非语法错误),在 js 逆向中,通过静态分析还原出相对容易看的出的代码有对于代码分析,而对于一些需要知道某一变量执行后的结果静态分析是做不到的。
环境安装
首先需要 Node 环境,这就不介绍了,其次工具 Babel 编译器可通过 npm 安装
npm i @babel/core -S-D
安装代码提示
npm i @types/node @types/babel__traverse @types/babel__generator -D
新建 js 文件,导入相关模块(也可使用 ES module 导入),大致代码如下
const fs = require('fs')
const parser = require('@babel/parser')
const traverse = require('@babel/traverse').default
const t = require('@babel/types')
const generator = require('@babel/generator').default

let jscode = fs.readFileSync(__dirname + "/demo.js", {
	encoding: "utf-8"
})

// 解析为AST
let ast = parser.parse(jscode)

// 转化特征代码
traverse(ast, {
	...
})

// 生成转化后的代码
let code = generator(ast).code
babel 的编译过程主要有三个阶段
- 解析(Parse): 将输入字符流解析为 AST 抽象语法树
- 转化(Transform): 对抽象语法树进一步转化
- 生成(Generate): 根据转化后的语法树生成目标代码
AST 的 API
在进行编译前,首先需要了解 Babel 的一些相关 API,这边所选择的是 babel/parser 库作为解析,还有一个在线 ast 解析网站AST explorer 能帮助我们有效的了解 AST 中的树结构。
同时 Babel 手册(中文版) babel-handbook强烈建议反复阅读,官方的例子远比我所描述来的详细。
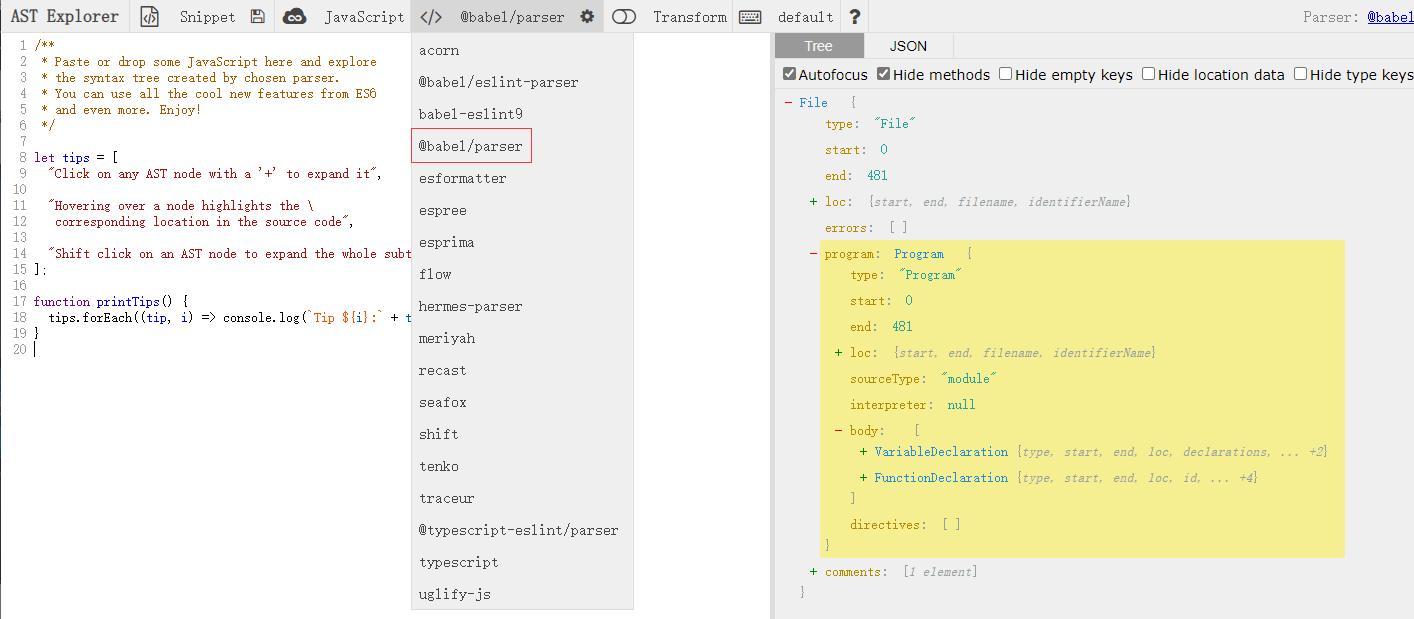
例子
这边就举一个非常简单的例子,混淆变量名(或说标识符混淆)感受一下。引用网站代码例子
/**
 * Paste or drop some JavaScript here and explore
 * the syntax tree created by chosen parser.
 * You can use all the cool new features from ES6
 * and even more. Enjoy!
 */

let tips = [
  "Click on any AST node with a '+' to expand it",

  'Hovering over a node highlights the \
   corresponding location in the source code',

  'Shift click on an AST node to expand the whole subtree',
]

function printTips() {
  tips.forEach((tip, i) => console.log(`Tip ${i}:` + tip))
}
比如说,我要将这个 tips 标识符更改为_0xabcdef ,那么肯定是需要找到这个要 tips,在 Babel 中要找到这个则可以通过遍历特部位(如函数表达式,变量声明等等)。
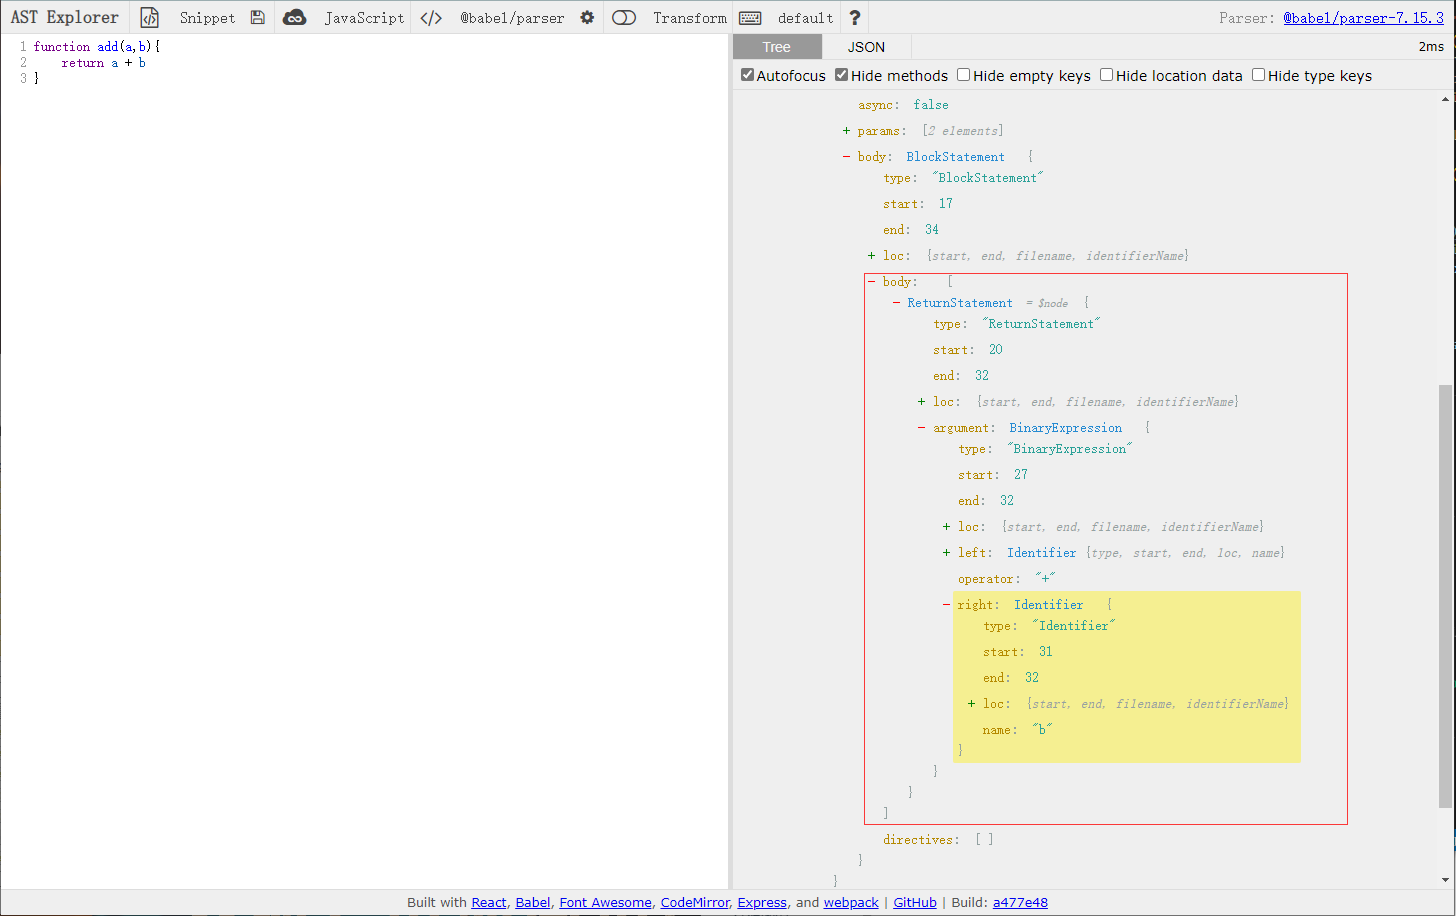
鼠标点击这个 tips 查看 tips 变量在树节点中的节点。
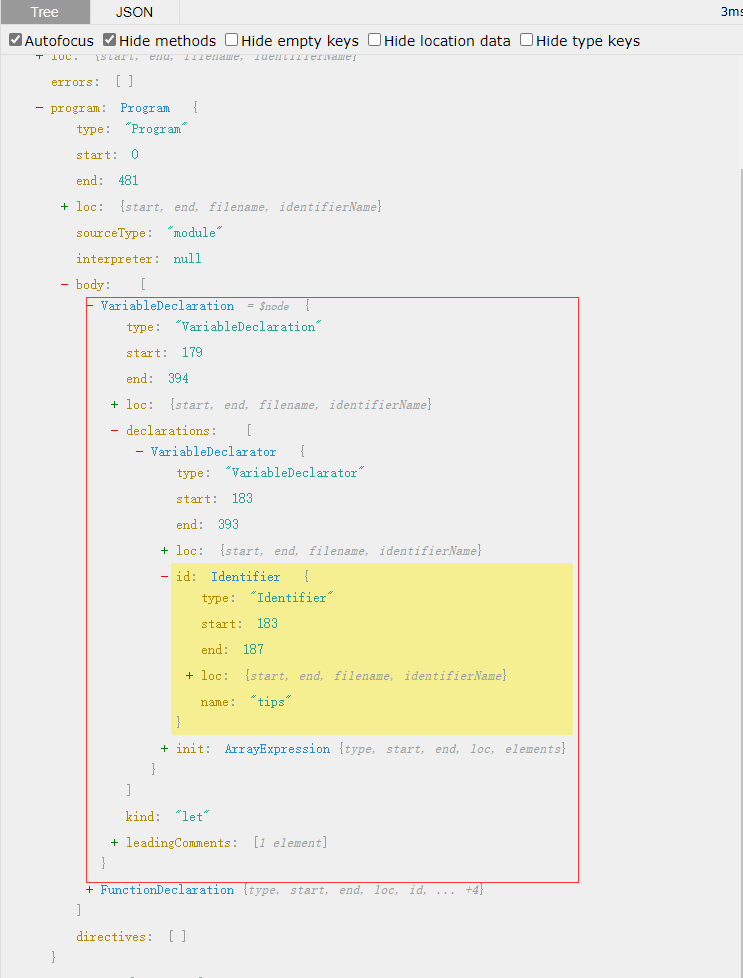
这边可以看到有两个蓝色标记的节点,分别是VariableDeclaration和VariabelDeclarator,翻译过来便是变量声明与变量说明符,很显然整个let tips = [ ] 是VariableDeclaration,而tips则是VariabelDeclarator。
所以要将tips更改为_0xabcdef就需要遍历VariabelDeclarator并判断属性name是否为tips,大致代码如下。(后文代码将会省略模块引入、js 代码读取、解析与生成的代码)
const fs = require('fs')
const parser = require('@babel/parser')
const traverse = require('@babel/traverse').default
const t = require('@babel/types')
const generator = require('@babel/generator').default
let jscode = fs.readFileSync(__dirname + '/demo.js', { encoding: 'utf-8' })
let ast = parser.parse(jscode)
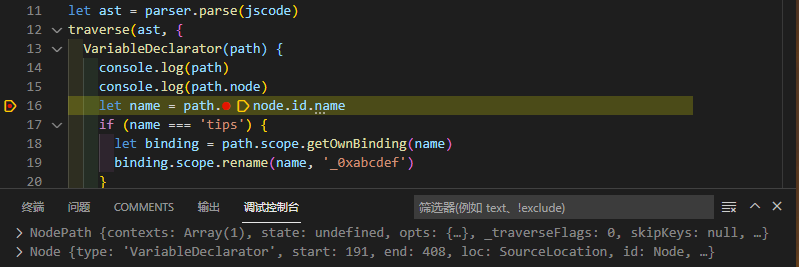
traverse(ast, {
VariableDeclarator(path) {
let name = path.node.id.name
if (name === 'tips') {
let binding = path.scope.getOwnBinding(name)
binding.scope.rename(name, '_0xabcdef')
}
},
})
let code = generator(ast).code
生成的代码如下,成功的将tips更改为_0xabcdef,并且是tips的所有作用域(printTips 函数下)都成功替换了。
/**
 * Paste or drop some JavaScript here and explore
 * the syntax tree created by chosen parser.
 * You can use all the cool new features from ES6
 * and even more. Enjoy!
 */
let _0xabcdef = ["Click on any AST node with a '+' to expand it", "Hovering over a node highlights the \
   corresponding location in the source code", "Shift click on an AST node to
expand the whole subtree"];

function printTips() {
  _0xabcdef.forEach((tip, i) => console.log(`Tip ${i}:` + tip));
}
简单描述下上述代码的过程
1、遍历所有VariableDeclarator节点,也就是tips变量说明符(标识符)
2、获取当前遍历到的标识符的 name,也就是path.node.id.name,在树节点是对应的也是id.name
3、判断 name 是否等于 tips,是的话,通过path.scope.getOwnBinding(name),获取当前标识符(tips)的作用域,scope 的意思就是作用域,如果只是赋值操作的话如path.node.id.name = '_0xabcdef',那只修改的let tips = 的 tips,而后面的对 tips 进行forEach操作的 tips 并不会更改,所以这里才需要使用binding来获取 tips 的作用域,并调用提供好的rename方法来进行更改。
4、调用binding.scope.rename(name, '_0xabcdef'),将旧名字 name(tips)更改为_0xabcdef,就此整个遍历就结束,此时的 ast 已经发生了变化,所以只需要根据遍历过的 ast 生成代码便可得到修改后的代码。
如果在仔细观察的话,其实Identifier(标识符)也是蓝色表示的,说明Identifier也同样可以遍历,甚至比上面的效果更好(后续替换所有的标识符也是遍历这个)
traverse(ast, {
  Identifier(path) {
    let name = path.node.name
    console.log(name)
    if (name === 'tips') {
      let binding = path.scope.getOwnBinding(name)
      binding.scope.rename(name, '_0xabcdef')
    }
  },
})
并尝试输出所有的标识符,输出的 name 结果为
tips
printTips
_0xabcdef
forEach
tip
i
console
log
i
tip
这个例子也许有点啰嗦,但我认为是有必要的,同时想说的是某种混淆(还原)的实现往往可以有好几种方法遍历,会懂得融会贯通,AST 混淆与还原才能精通。
parser 与 generator
前者用于将 js 代码解析成 AST,后者则是将 AST 转为 js 代码,两者的具体参数可通过 babel 手册查看,这就不做过多介绍了。
babel-handbook #babel-generator
traverse 与 visitor
整个 ast 混淆还原最关键的操作就是遍历,而 visitor 则是根据特定标识(函数声明,变量订阅)来进行遍历各个节点,而非无意义的全部遍历。
traverse 一共有两个参数,第一个就是 ast,第二个是 visitor,而 visitor 本质是一个对象如下(分别有 JavaScript 和 TypeScript 版本,区别就是在于这样定义的 visitor 是否有代码提示)
- JS
- TS
const visitor = {
  FunctionDeclaration(path) {
    console.log(path.node.id.name) // 输出函数名
  },
}
let visitor: Visitor = {
  FunctionDeclaration(path) {
    console.log(path.node.id.name) // 输出函数名
  },
}
一般来说,都是直接写到写到 traverse 内。个人推荐这种写法,因为能有 js 的代码提示,如果是 TypeScript 效果也一样。
traverse(ast, {
  FunctionDeclaration(path) {
    console.log(path.node.id.name) // 输出函数名
  },
})
如果我想遍历函数声明与二项式表达式的话,还可以这么写
traverse(ast, {
  'FunctionDeclaration|BinaryExpression'(path) {
    let node = path.node
    if (t.isFunctionDeclaration(node)) {
      console.log(node.id.name) // 输出函数名 printTips
    } else if (t.isBinaryExpression(node)) {
      console.log(node.operator) // 输出操作符 +
    }
  },
})
不过要遍历不同类型的代码,那么对应的 node 属性肯定大不相同,其中这里使用了 t(也就是@babel/types库)来进行判断 node 节点是否为该属性,来进行不同的操作,后文会提到 types。
上述操作将会输出 printTips 与 + 因为 printTips 函数中代码有 Tip ${i}: + tip ,这就是一个二项式表达式。
此外 visitor 中的属性中,还对应两个生命周期函数 enter(进入节点)和 exit(退出节点),可以在��这两个周期内进行不同的处理操作,演示代码如下。
traverse(ast, {
  FunctionDeclaration: {
    enter(path) {
      console.log('进入函数声明')
    },
    exit(path) {
      console.log('退出函数声明')
    },
  },
})
其中 enter 与 exit 还可以是一个数组(当然基本没怎么会用到),比如
traverse(ast, {
  FunctionDeclaration: {
    enter: [
      path => {
        console.log('1')
      },
      path => {
        console.log('2')
      },
    ],
  },
})
path 对象下还有一种方法,针对当前 path 进行遍历 path.traverse,比如下面代码中,我遍历到了 printTips,我想输出函数内的箭头函数中的参数,那么就可以使用这种遍历。
function printTips() {
  tips.forEach((tip, i) => console.log(`Tip ${i}:` + tip))
}
此时的 path.traverse 的第一个参数便不是 ast 对象了,而是一个 visitor 对象
traverse(ast, {
  FunctionDeclaration(path) {
    path.traverse({
      ArrowFunctionExpression(path) {
        console.log(path.node.params)
      },
    })
  },
})
输出的结果如下
[
  Node {
    type: 'Identifier',
    start: 40,
    end: 43,
    loc: SourceLocation {
      start: [Position],
      end: [Position],
      filename: undefined,
      identifierName: 'tip'
    },
    name: 'tip'
  },
  Node {
    type: 'Identifier',
    start: 45,
    end: 46,
    loc: SourceLocation {
      start: [Position],
      end: [Position],
      filename: undefined,
      identifierName: 'i'
    },
    name: 'i'
  }
]
types
该库主要的作用是判断节点类型与生成新的节点。判断节点类型上面已经演示过了,比如判断 node 节点是否是为标识符t.isIdentifier(path.node),等同于path.node.type === "Identifier"
判断节点类型是很重要的一个环节,有时候混淆需要针对很多节点进行操作,但并不是每个节点都有相同的属性,判断节点才不会导致获取到的节点属性出错,甚至可以写下面的代码(将输出所有函数声明与箭头函数的参数)。
traverse(ast, {
  enter(path) {
    t.isFunctionDeclaration(path.node) && console.log(path.node.params)
    t.isArrowFunctionExpression(path.node) && console.log(path.node.params)
  }
})
types 的主要用途还是构造节点,或者说写一个 Builders(构建器),例如我要生成 let a = 100 这样的变量声明原始代码,通过 types 能轻松帮我们生成。
不过先别急着敲代码,把let a = 100代码进行 ast 解析,看看每个代码的节点对应的 type 都是什么,这样才有助于生成该代码。
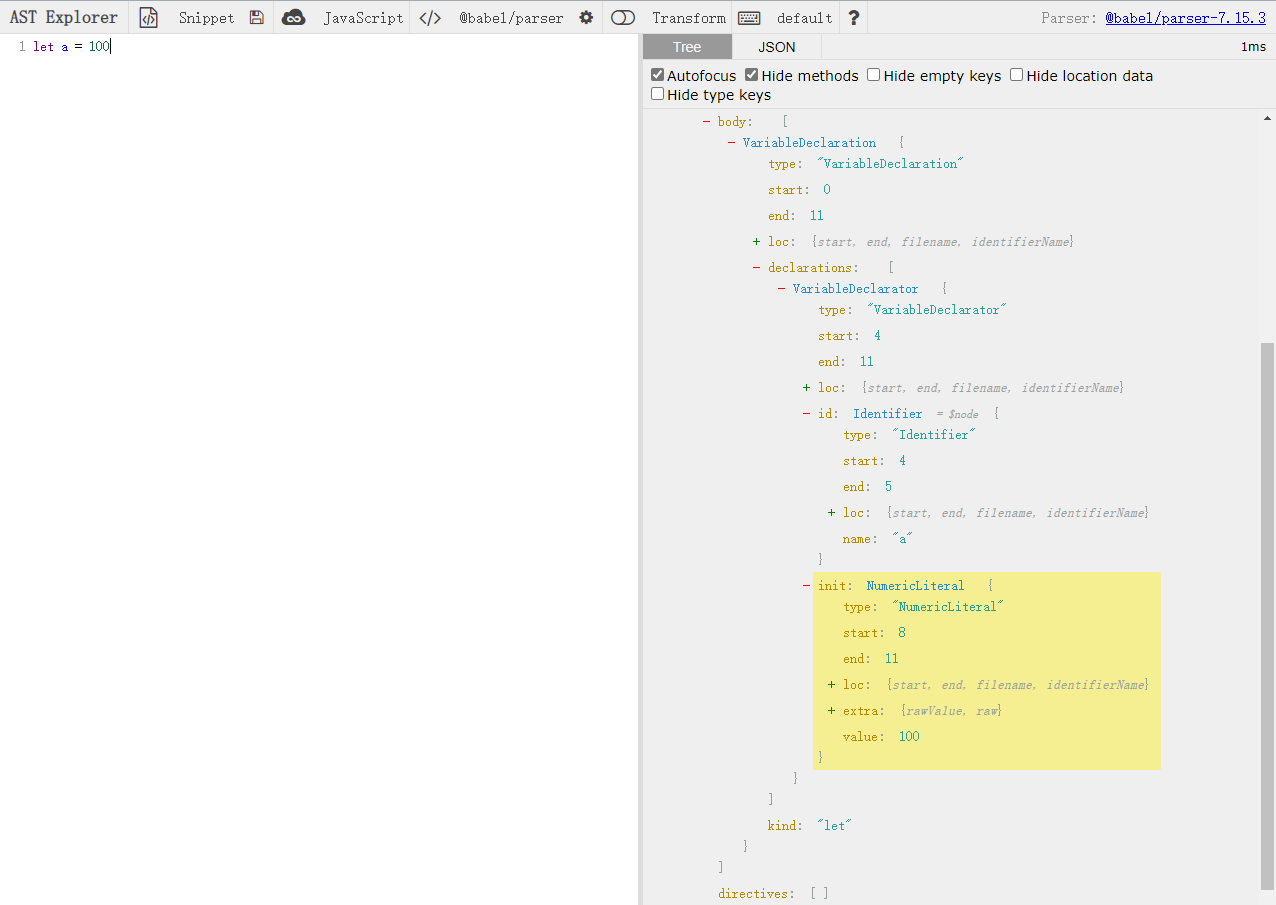
body 内的第一个节点便是我们整条的代码,输入t.variableDeclaration(),鼠标悬停��在 variableDeclaration 上,或者按 Ctrl 跳转只.d.ts 类型声明文件 查看该方法所需几个参数
declare function variableDeclaration(
  kind: 'var' | 'let' | 'const',
  declarations: Array<VariableDeclarator>,
): VariableDeclaration
可以看到第一个参数就是关键字,而第二个则一个数组,其中节点为VariableDeclarator,关于variableDeclaration与 VariableDeclarator 在前面已经提及过一次了,就不在赘述了。由于我们这里只是声明一个变量 a,所有数组成员只给一个便可,如果要生成 b,c 这些变量,就传入对应的VariableDeclarator即可
这时候在查看下 VariableDeclarator 方法参数
declare function variableDeclarator(id: LVal, init?: Expression | null): VariableDeclarator
第一个参数 id 很显然就是标识符了,不过这里的 id 不能简简单单传入一个字符串 a,而需��要通过t.identifier('a')生成该节点,在上图中 id 就是对应Identifier节点。然后就是第二个参数了,一个表达式,其中这个Expression是 ts 中的联合类型(Union Types),可以看到有很多表达式
declare type Expression =
  | ArrayExpression
  | AssignmentExpression
  | BinaryExpression
  | CallExpression
  | ConditionalExpression
  | FunctionExpression
  | Identifier
  | StringLiteral
  | NumericLiteral
  | NullLiteral
  | BooleanLiteral
  | RegExpLiteral
  | LogicalExpression
  | MemberExpression
  | NewExpression
  | ObjectExpression
  | SequenceExpression
  | ParenthesizedExpression
  | ThisExpression
  | UnaryExpression
  | UpdateExpression
  | ArrowFunctionExpression
  | ClassExpression
  | MetaProperty
  | Super
  | TaggedTemplateExpression
  | TemplateLiteral
  | YieldExpression
  | AwaitExpression
  | Import
  | BigIntLiteral
  | OptionalMemberExpression
  | OptionalCallExpression
  | TypeCastExpression
  | JSXElement
  | JSXFragment
  | BindExpression
  | DoExpression
  | RecordExpression
  | TupleExpression
  | DecimalLiteral
  | ModuleExpression
  | TopicReference
  | PipelineTopicExpression
  | PipelineBareFunction
  | PipelinePrimaryTopicReference
  | TSAsExpression
  | TSTypeAssertion
  | TSNonNullExpression
其中我们所要赋值的数值 100,对应的节点类型NumericLiteral也在其中。在查看 numericLiteral 中的参数,就只给一个数值,那么便传入 100。
declare function numericLiteral(value: number): NumericLiteral;
最后整个代码如下,将 t.variableDeclaration 结果赋值为一个变量var_a,这里的 var_a 便是一个 ast 对象,通过 generator(var_a).code 就可以获取到该 ast 的代码,也就是 let a = 100;,默认还会帮你添加分号
let var_a = t.variableDeclaration('let', [
  t.variableDeclarator(t.identifier('a'), t.numericLiteral(100)),
])

let code = generator(var_a).code
// let a = 100;
这边再列举一个生成函数声明代码的例子(不做解读),要生成的代码如下
function b(x, y) {
  return x + y
}
types 操作
let param_x = t.identifier('x')
let param_y = t.identifier('y')
let func_b = t.functionDeclaration(
  t.identifier('b'),
  [param_x, param_y],
  t.blockStatement([t.returnStatement(t.binaryExpression('+', param_x, param_y))]),
)

let code = generator(func_b).code
大致步骤可以总结成一下几点
1、将要生成的 js 代码进行 ast Explorer 查看树结构,理清所要构造的代码节点(很重要)
2、找到最顶层的结果,如 variableDeclaration,查看该代码所对应的参数
3、进一步的分析内层节点结构,构造出最终的原始代码。
types 还有一个方法valueToNode,先看演示
let arr_c = t.valueToNode([1, 2, 3, 4, 5])
console.log(arr_c)

{
  type: 'ArrayExpression',
  elements: [
    { type: 'NumericLiteral', value: 1 },
    { type: 'NumericLiteral', value: 2 },
    { type: 'NumericLiteral', value: 3 },
    { type: 'NumericLiteral', value: 4 },
    { type: 'NumericLiteral', value: 5 }
  ]
}
如果使用numericLiteral来生成这些字面量的话那要写的话代码可能就要像下面这样
let arr_c = t.arrayExpression([
  t.numericLiteral(1),
  t.numericLiteral(2),
  t.numericLiteral(3),
  t.numericLiteral(4),
  t.numericLiteral(5),
])
而valueToNode能很方便地生成各种基本类型,甚至是一些对象类型(RegExp,Object 等)。不过像函数这种就不行。
t.valueToNode(function b(x, y) {
  return x + y
})
// throw new Error("don't know how to turn this value into a node");
写到着,其实不难发现,每个 node 节点其实就是一个 json 对象,而 types 只是将其封装好方法,供使用者调用,像下面这样方式定义 arr_c,同样也能生成数组 [1, 2, 3, 4, 5]
let arr_c = {
  type: 'ArrayExpression',
  elements: [
    { type: 'NumericLiteral', value: 1 },
    { type: 'NumericLiteral', value: 2 },
    { type: 'NumericLiteral', value: 3 },
    { type: 'NumericLiteral', value: 4 },
    { type: 'NumericLiteral', value: 5 },
  ],
}
let code = generator(arr_c).code
至于生成其他的语句,原理与上述一致,篇幅有限不在做其他例子演示了,Babel 中的 API 很多,最主要的是懂得善用手册与代码提示,没有什么生成不了的语句,更没有还原不了的代码。
Path
上述讲了基本的库操作,不难发现,使用到最多的还是 traverse,并且都会传入一个参数 path,并且path.node使用到的频率很多,能理解请两个的区别(Node 与 NodePath),基本上你想遍历到的地方就没有遍历不到的。
先说说 path 能干嘛,能停止遍历当前节点 (path.stop),能跳过当前节��点(path.skip),还可以获取父级 path(path.parentPath ),替换当前节点(path.replaceWith),移除当前节点(path.remove)等等。
获取 Node 节点属性
path.node 也就是当前节点所在的 Node 对象,比如loc、id、init,param、name等,这些都是在 node 对象下都是能直接获取到的。
不过获取到的是 node 对象,就无法使用 path 对象的方法了,如果要获取该属性的 path,就可以使用path.get('name'),获取到的就是 path 对象。不过对于一些特定的属性(name,operator)获取 path 对象就多此一举了。
一共有两种类型 Node 与 NodePath,记住有Path则是path,如path就属于NodePath,而path.node 属于Node。
将节点转为代码
有时候遍历到一系列的代码,想输出一下原始代码,那么有以下两种方式。
traverse(ast, {
  FunctionDeclaration(path) {
    console.log(generator(path.node).code)
    console.log(path.toString())
  },
})
替换节点属性
与获取节点属性相同,比如我需要修改函数的第一个参数,那么我只要获取到第一个参数,并且将值赋值为我想修改值(node 对象)便可。
traverse(ast, {
  FunctionDeclaration(path) {
    path.node.params[0] = t.identifier('x')
  },
})
替换整个节点
替换的相关方法有
replaceWith 一对一替换当前节点,且严格替换。
path.replaceWith(t.valueToNode('kuizuo'))
replaceWithMultiple 则是一对多,将多个节点替换到一个节点上。
traverse(ast, {
  ReturnStatement(path) {
    path.replaceWithMultiple([
      t.expressionStatement(
        t.callExpression(t.memberExpression(t.identifier('console'), t.identifier('log')), [
          t.stringLiteral('kuizuo'),
        ]),
      ),
      t.returnStatement(),
    ])
    path.stop()
  },
})
要注意的是,替换节点要非常谨慎,就比如上述代码,如果我遍历 return 语句,同时我又替换�成了 return 语句,替换后的节点同样是可以进入到遍历里,如果不进行停止,将会造成死循环,所以这里才使用了path.stop完全停止当前遍历,直到下一条 return 语句。
path.skip()跳过遍历当前路径的子路径。path.stop()完全停止当前遍历
relaceInline 接收一个参数,如果不为数组相当于replaceWith,如果是数组相当于replaceWithMultiple
replaceWithSoureString 该方式将字符串源码与节点进行替换,例如
// 要替换的函数
function add(a, b) {
  return a + b
}

traverse(ast, {
  FunctionDeclaration(path) {
    path.replaceWithSourceString(`function mult(a, b){
      return a * b
    }`)
    path.stop()
  },
})

// 替换后的结果
// (function mult(a, b) {
//   return a * b;
// });
删除节点
traverse(ast, {
  EmptyStatement(path) {
    path.remove()
  },
})
EmptyStatement指空语句,也就是多余的分号。
插入节点
insertBefore与insertAfter分别在当前节点前后插入语句
traverse(ast, {
  ReturnStatement(path) {
    path.insertBefore(t.expressionStatement(t.stringLiteral('before')))
    path.insertAfter(t.expressionStatement(t.stringLiteral('after')))
  },
})
父级 path
path.parent 表示父级的 node
path.parentPath 表示父级的 path,也就是 NodePath
path.parentPath.node === path.parent 两者效果一样,都是获取 Node 对象。
此外还有一些方法也可以获取父级 Path
path.findParent 向上遍历每一个父级 Path 并根据条件返回,与数组 find 方式类型。
traverse(ast, {
  BinaryExpression(path) {
    let parent = path.findParent(p => p.isFunctionDeclaration())
    console.log(parent.toString())
  },
})
path.find 与 findParent 方式类似,不过 find 方法不包括当前节点,而 findParent 不包括。
path.getFunctionParent 向上查找与当前节点最接近的父函数,返回的是 Path 对象。
path.getStatementParent 遍历语法树,直到找到语句节点(带有 Statement),如 return 语句(ReturnStatement),if 语句(IfStatement),块级语句(BlockStatement)
同级 path
path 有一个属性 container,表示当前节点所处于的那个节点下,共有那些同级节点,而 listKey 表示容器名。key 表示索引或是是容器对象的属性名
traverse(ast, {
  ReturnStatement(path) {
    console.log(path.key)
    console.log(path.listKey)
    console.log(path.container)
  },
})
// 输出结果
0
body
[
  Node {
    type: 'ReturnStatement',
    start: 24,
    end: 36,
    loc: SourceLocation {
      start: [Position],
      end: [Position],
      filename: undefined,
      identifierName: undefined
    },
    argument: Node {
      type: 'BinaryExpression',
      start: 31,
      end: 36,
      loc: [SourceLocation],
      left: [Node],
      operator: '+',
      right: [Node]
    }
  }
]
在 ast 树结构中框中所表示
也并不是说所有节点都有同级节点,也并不是所有的 container 都是一个数组,例如下面这个例子
let obj = {
  name: 'kuizuo',
}
init
undefined
Node {
  type: 'VariableDeclarator',
  start: 4,
  end: 30,
  loc: SourceLocation {
    start: Position { line: 1, column: 4 },
    end: Position { line: 3, column: 1 },
    filename: undefined,
    identifierName: undefined
  },
  id: Node {
    type: 'Identifier',
    start: 4,
    end: 7,
    loc: SourceLocation {
      start: [Position],
      end: [Position],
      filename: undefined,
      identifierName: 'obj'
    },
    name: 'obj'
  },
  init: Node {
    type: 'ObjectExpression',
    start: 10,
    end: 30,
    loc: SourceLocation {
      start: [Position],
      end: [Position],
      filename: undefined,
      identifierName: undefined
    },
    properties: [ [Node] ]
  }
}
对应 AST 树结构中所框选
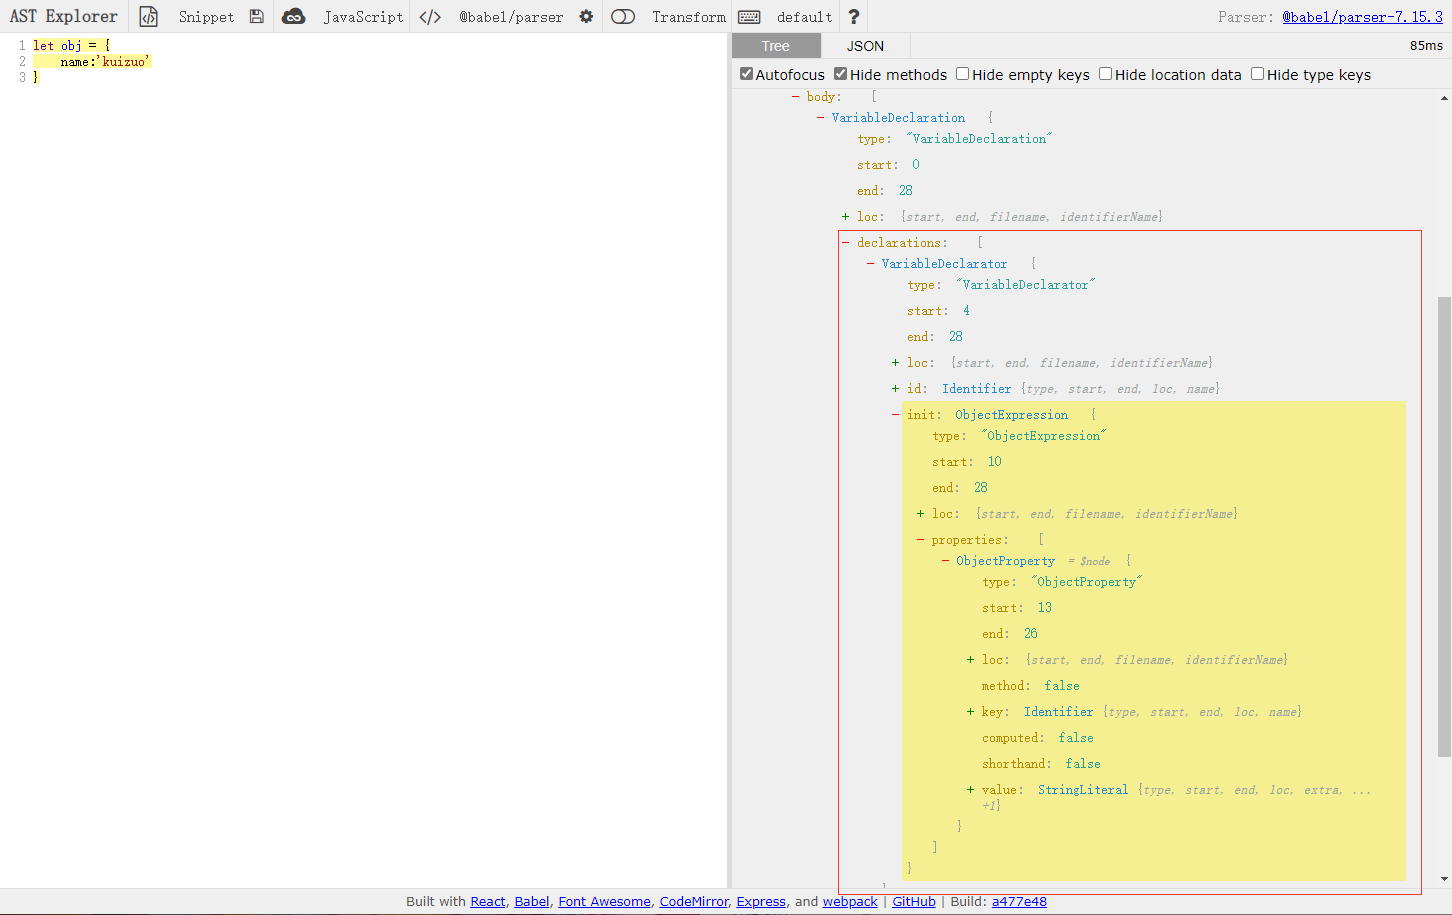
也就是说该节点并没有同级节点
其中�关于同级节点有以下几种方法。
path.inList 判断 container 属性是否为数组
path.getSibling(index) 获取当前节点所在容器中索引对应的同级节点,index 可通过 path.key 获取。
其中还有unshiftContainer与pushContainer,在容器前与后添加节点,与Array.unshift和Array.push方法类似,不过基本没怎么用过,便不做实例了。
Scope
path.scope 字面名意思为作用域,可以方便查找标识符的引用。如当前变量的哪里被调用了,标识符为参数还是变量。
演示代码
function test() {
  let obj = {
    name: 'kuizuo',
  }
  return obj
}
获取标识符代码块
scope.block 返回 Node 对象,使用方法分为两种情况,变量与函数。
traverse(ast, {
  ObjectExpression(path) {
    let block = path.scope.block
    console.log(generator(block).code)
  },
})

// function test() {
//   let obj = {
//     name: 'kuizuo'
//   };
//   return obj;
// }
返回的是整个函数体代码
traverse(ast, {
  ObjectExpression(path) {
    let block = path.scope.block
    console.log(generator(block).code)
  },
})

// function test() {
//   let obj = {
//     name: 'kuizuo'
//   };
//   return obj;
// }
由于scope.block返回的是 Node 对象,将就无法使用 path.toString()转为原始代码了。
binding
scope.getBinding() 接收一个参数,可用于获取标识符的绑定,这里的 binding 可能会有些抽象,在一开始的例子中初次接触到
traverse(ast, {
  VariableDeclarator(path) {
    let name = path.node.id.name
    if (name === 'tips') {
      let binding = path.scope.getOwnBinding(name)
      console.log(binding)
      binding.scope.rename(name, '_0xabcdef')
    }
  },
})
其中这里的 binding 是属性相对较多,下面会一一介绍
Binding {
  identifier: Node {type: 'Identifier', name: 'tips'},
  scope: <ref *1> Scope {
  path: NodePath {...},
  kind: 'let',
  constantViolations: [],
  constant: true,
  referencePaths: [
    NodePath {...}
  ],
  referenced: true,
  references: 1,
  hasDeoptedValue: false,
  hasValue: false,
  value: null
}
要注意的是,getBinding 中传的值必须是当前节点能够引用到的标识符,如果当前标识符不存在,那么返回 undefined。
identifier 是标识符 tips 的 Node 的对象,path 则是标识符 Path 对象,constant 为布尔值,表示当前标识符是否为常量,referenced 表示当前节点是否被引用。references 表示引用的次数。
binding 中的 scope 等同于 path 中的 scope,作用域范围相同。
scope.getOwnBinding() 获取当前节点下的绑定,不包含其他父级中定义的标识符,会包含子函数中定义的标识符绑定。
referencePaths 与 constantViolations
假如标识符被引用,referencePaths 中会存放所有引用该标识的 path 对象数组。像下面这样
referencePaths: [
    NodePath {
      contexts: [],
      state: [Object],
      opts: [Object],
      _traverseFlags: 0,
      skipKeys: null,
      parentPath: [NodePath],
      container: [Node],
      listKey: undefined,
      key: 'object',
      node: [Node],
      type: 'Identifier',
      parent: [Node],
      hub: undefined,
      data: null,
      context: [TraversalContext],
      scope: [Scope]
    }
  ],
而 constantViolations 则是存放所有修改标识符的 Path 对象。
标识符重命名
这在一开始的例子中就简单介绍过了,使用的是 rename 方法,能将该标识符中所有引用的地方重命名,不过上面的例子只是重命名 tips,想要重命名所有标识符的话,就需要遍历 Identifier。不过重命名标识符不能都重命名为相同字符,有一个 api path.scope.generateUidIdentifier 用于生成唯一不重复标识符。
traverse(ast, {
  Identifier(path) {
    path.scope.rename(path.node.name, path.scope.generateUidIdentifier('_0xabcdef').name)
  },
})
最终生成的代码如下
**
 * Paste or drop some JavaScript here and explore
 * the syntax tree created by chosen parser.
 * You can use all the cool new features from ES6
 * and even more. Enjoy!
 */
let _0xabcdef11 = ["Click on any AST node with a '+' to expand it", "Hovering over a node highlights the \
   corresponding location in the source code", "Shift click on an AST node to expand the whole subtree"];

function _0xabcdef2() {
  _0xabcdef11.forEach((_0xabcdef10, _0xabcdef9) => console.log(`Tip ${_0xabcdef9}:` + _0xabcdef10));
}
scope.hasBinding('a') 查询是否有标识符 a 的绑定
scope.getAllBindings() 获取当前节点下所有绑定,返回一个对象,以标识符名作为属性名,值为 binding。
scope.hasReference('a') 查询当前节点是否有标识符 a 的引用。
当然大部分的 api 还需要自行翻阅文档,或通过代码提示与动态调试查看方法,举一反三,来达到所想要的目的。
混淆实战
关于混淆实战的代码都已贴到 Githubkuizuo/AST-obfuscator,在src/obfuscated中便可看到完整��的混淆程序。其中也包括一些实战还原的例子,大部分的写法都采用了 ES6 的类来写,方便编写理解。
大部分混淆的例子在这本书《反爬虫 AST 原理与还原混淆实战》中都有,例如常量混淆,数组混淆与乱序,标识符混淆等等就不细说了,上传的代码中有,不过书中有一些 es6 的代码是没提及到的。
模板字符串
与StringLiteral不同,模板字符串的 type 是TemplateLiteral,所以是遍历不到模板字符串的。下文将用代码来实现将模板字符串转为字符串拼接
演示代码
let a = 'kuizuo'
;`${a}nb${12}3${'456'}`
分析 AST 树结构
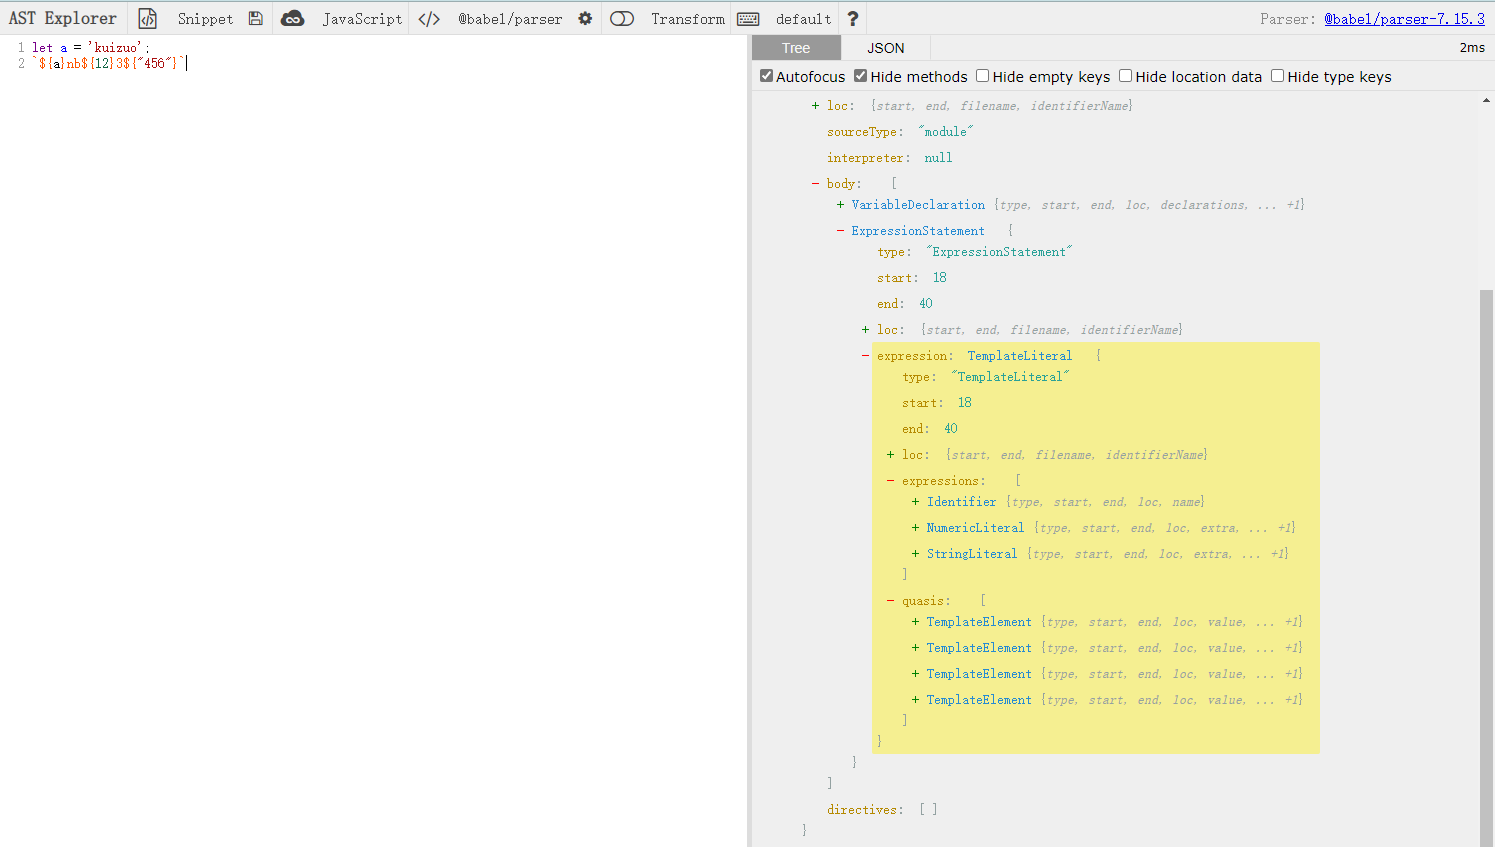
不难观察出,parser 将其成两部分expressions与quasis。而所要转�为的最终代码应该是'' + a + 'nb' + 12 + '3' + '456'+ '',并且quasis成员个数始终比expressions多一位,所以只需要将expressions插入置quasis成员内,然后通过 binaryExpression 进行拼接即可。大致的思路有了,那么就开始用代码来进行拼接。
traverse(ast, {
  TemplateLiteral(path) {
    let { expressions, quasis } = path.node
    // 将expressions节点逐个插入到quasis节点上
    for (const i in expressions) {
      let e = expressions[i]
      quasis.splice(i * 2 + 1, 0, e)
    }
    let newExpressions = quasis

    // 循环新的表达式节点构造出二项式表达式
    let binary
    for (let i = 0; i < newExpressions.length; i++) {
      let left = binary
      let right = newExpressions[i]
      if (i === 0) {
        left = t.valueToNode(right.value.raw)
        binary = left
        continue
      }

      if (t.isTemplateElement(right)) {
        // if (right.value.raw === '') continue
        right = t.valueToNode(right.value.raw)
      }
      binary = t.binaryExpression('+', left, right)
    }
    path.replaceWith(binary)
  },
})
最终输出 "" + a + "nb" + 12 + "3" + "456" + ""
类声明
同样,类名与类方法名同样也是可以混淆的,演示��代码如下
class Test {
  age = 20
  constructor(name) {
    this.name = name
  }

  run() {
    return this.name + this.age
  }
}

let test = new Test('kuizuo')
console.log(test.run())
复制上述代码,观察 AST 树结构(图就不放了)
不难发现,其实就是 type ClassDeclaration、ClassProperty、ClassMethod,通过标识符混淆的方法renameIdentifier,将Program|FunctionExpression|FunctionDeclaration新增这两个 type 即可
traverse(ast, {
  'Program|FunctionExpression|FunctionDeclaration|ClassDeclaration|ClassProperty|ClassMethod'(
    path,
  ) {
    renameOwnBinding(path)
  },
})
但混淆完的代码并没有把属性名与方法名给混淆到
class OOOOO0 {
  age = 399100 ^ 399080

  constructor(OOOOO0) {
    this[atob(OOOOOO[226019 ^ 226019])] = OOOOO0
  }

  run() {
    return this[atob(OOOOOO[255772 ^ 255772])] + this[atob(OOOOOO[982314 ^ 982315])]
  }
}
不过这样混淆肯定远远不够的,方法可是类中很重要的属性,同时类方法与属性还能这么编写(constructor 不行),然后将下面的代码通过混淆程序执行一遍就能成功混淆变量名。
class Test {
  ['age'] = 20
  constructor(name) {
    this.name = name
  }

  ['run']() {
    return this.name + this.age
  }
}
所以将run() 转为[‘run’]()便成为了关键。而实现起来也相对简单(与改变对象访问方式一样)
traverse(ast, {
  'ClassProperty|ClassMethod'(path) {
    if (t.isIdentifier(path.node.key)) {
      let name = path.node.key.name
      if (name === 'constructor') return
      path.node.key = t.stringLiteral(name)
    }
    path.node.computed = true
  },
})
最终运行混淆程序,执行混淆后的代码,成功输出kuizuo20
后续有时间再补充。。。
混淆心得
混淆前提
不改变原有代码的执行过程与结果,并不是随便混淆都行了,比如let c = a + b ,总不能混淆成 let OO = Oo - oO吧。其次要懂得利用 js 语法的特性来进行混淆,比如高阶函数,函数传参,jsfuck 等等。
混淆并非万能
混淆始终是混淆,只是将代码相对变得难以阅读,但不代表不可阅读。只要程序能运行,那么我就能调试,能调试还能有什么解决不了的(毕竟 bug 都是调试出来)。如果真想保全你的代码,那我的建议是编译成二进制文件,或采用远程调用的形式将执行后的结果返回。
代码执行效率
通常来说,混淆会使你的代码数量增大至 2,3 倍,与加密壳同理,但程序的执行速度也会稍慢下,当然只要不是特别 ex 的混淆,如将函数调用封装至,3,4 层的调用导致调用堆栈过大,那么这种执行效率基本可以忽略不计。
有混淆就有还原
既然混淆是通过 AST 来进行混淆的,那么还原也同样可以,不过还原就不可能还原出原始开发者所编写的,就如同一些打包工具打包后的代码,比如将 name 压缩成 n,age 压缩成 a,那么就无法推断出 n 为 name,a 为 age,而混淆也是同理,像代码let OOOOOO = atob('a3VpenVv'),能还原的也只能是let OOOOOO = ‘kuizuo’或者是将标识符重新命名let _0x123456 = ‘kuizuo’,相对好看些。大部分的还原工作都只是将代码变得好读一些,比如atob('a3VpenVv')就可以变为‘kuizuo’,这便是基本的还原之一,关于还原还会另出一篇文章来记录,就不在这多废笔舌了。
整个混淆的过程来看,无非就是多了门技能,对 js 有了更��进一步的了解,略懂 js 编译过程中的语法分析,此外也感叹 Babel 提供如此强大的 api。同时也能尝试使用最新的 ECMAScript 语法特性,无需考虑兼容问题,babel 统统都能处理。就如同 babel 官网所说的:
现在就开始使用下一代 JavaScript 语法吧。